Gripsholm
Disclaimer: This post contains a very old attempt at shoemaking, during the very beginning of my journey. I really didn’t know what I was doing at this time, and the post is left online for archive purposes only. Please do not “learn” anything from it, as the post is certainly riddled with mistakes. It’s just a documentation on some of my thoughts as a beginner in this venture. For a more updated view of my shoemaking, please see my latest posts instead.
And so it was that six kinds of Italian leather, cut with knives, burned by fire, hammered and penetrated by steel, has taken it’s final form. Gripsholm is born.
This page is a summary of the finished shoes – in Part 1 and Part 2 I display in detail how they were made.

Construction: handmade with hand-held tools
Last: Springline 977, solid wood, size UK 10F
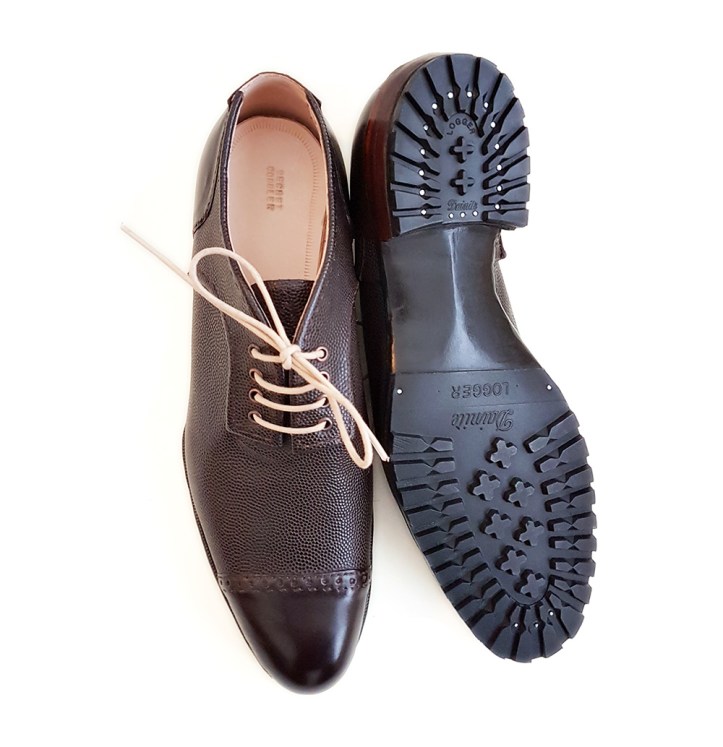
Uppers: 3 oz (1,2 mm) chrome tanned calf in dark brown, contrasted by 3-4 oz (1,4 mm) chrome tanned calf in dark brown pebble grain
Lining: 2 oz (0,8 mm) vegetable tanned baby calf, crust
Top beads: None (folded over 3-4 oz upper leather).
Insoles: 12-13 oz (5 mm) vegetable tanned calf butt
Insoles (sock liner): 4 oz (1,6 mm) vegetable tanned calf side
Mid/outsole: 12-13 oz (5 mm) vegetable tanned calf butt
Extra outsoles: Dainite Logger, rubber (half sole)
Toe/heel stiffeners: 5 oz (2 mm) vegetable tanned calf shoulder, attached with Hirschkleber
Rand and welt piece: 5 oz (2 mm) vegetable tanned calf shoulder
Shank: Plastic
Heel lifts: 5 oz (2 mm) vegetable tanned calf shoulder, attached with Hirschkleber, pegged
Top lifts: Dainite Logger, rubber
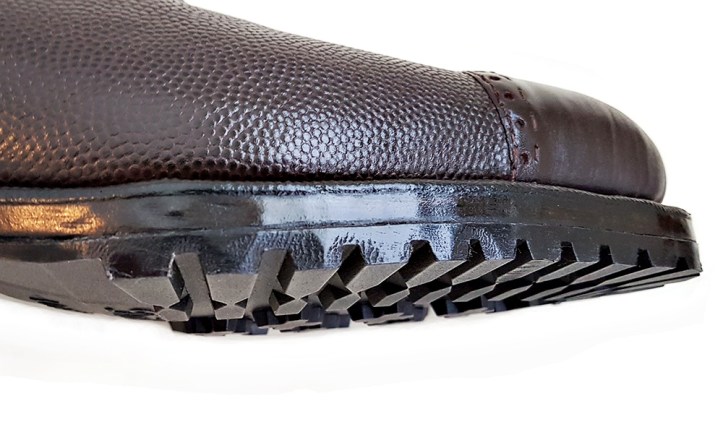
The rand and welt made from an intact piece of leather came out nicely. The derby facings weren’t exactly symmetrical, making the shoes appear a bit crooked. Folding the leather over made for slightly assymetrical pieces. The baby calf lining was very comfortable from the get go – the shoes fit me splendidly and required no breaking in. Despite the mistakes, as I consider this an experiment shoe, I am still content.
Here is Gripsholm as seen from above:

And here’s one of the shoes flipped over, displaying its fiddleback waist:
It’s a bit rugged, being my first attempt at such a waist, but let’s have another look at that fiddleback:

The welt was tucked snug against the shoe, and there is no joint separating the rand and welt:

Here is the tight welt as seen looking from the ball towards the toe:

The heel lfts turned out much better than on previous pairs. I burnished these heel lifts prior to applying gum thragacanth with a cotton chamois (which is a fancy way of saying: with a ripped up Fruit of the Loom t-shirt).

The outsole edge was also burnished before being treated with gum thragacanth (and then waxed with mirror gloss and pate de lux):
Ready for some countryside woodchopping:

Gripsholm and I then ventured out into the world…
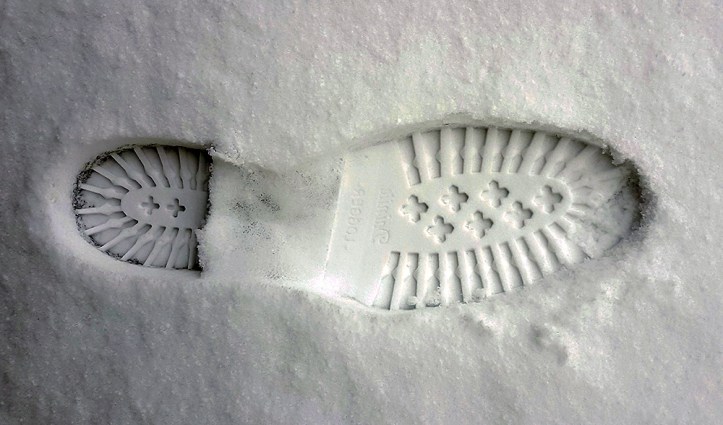
If you look closley at the footprint of Gripsholm, you can see the fiddleback waist leaving its mark in the Swedish snow.

The result is very nice…
I like the fiddleback waist, it gives the shoes a kind of sophistication wich contrasts nicely with the rubber outsole.
If you still get issues with the symmetry of your upper (and especially with the facings…), you can try to use the geometric method for pattern making. It’s not really longer nor harder than the masking tape method. I use the method described by Tim Skyrme in is book, and the final result is very accurate.
Best regards,
Antoine
LikeLike
Thanks again for the kind feedback, Antoine! I have so far not had the pleasure of Reading Tim Skyrme’s book, so I will definitely look into that as well. Hope to see you keep in touch!
LikeLike